Converting video files can be a time-consuming process, especially when dealing with large files or high-quality formats. But if you have an Nvidia GPU, you can speed things up significantly using Nvidia’s NVENC technology. In this guide, I’ll show you how to use HandBrake with Nvidia NVENC to quickly convert your video files to H.265 or H.264 formats.
Why Use Nvidia NVENC for Video Conversion?
NVENC is Nvidia’s hardware-accelerated video encoding technology. It allows your GPU to handle video encoding tasks, taking the load off your CPU. This results in faster conversion times and frees up your CPU for other tasks. If you have a modern Nvidia GPU, NVENC is a game-changer when it comes to video encoding. Whether you’re converting video files for storage, streaming, or playback on various devices, using Nvidia’s NVENC can save you a lot of time.

Setting Up HandBrake with Nvidia NVENC
To get started, you need HandBrake, a popular open-source video transcoder. HandBrake supports Nvidia NVENC, making it easy to harness the power of your Nvidia GPU for video conversion. First, download the latest version of HandBrake from the official website and install it if you haven’t already. Next, ensure that you have the latest Nvidia drivers installed on your system, as NVENC requires up-to-date drivers to function correctly. You can download the latest drivers from the Nvidia website.
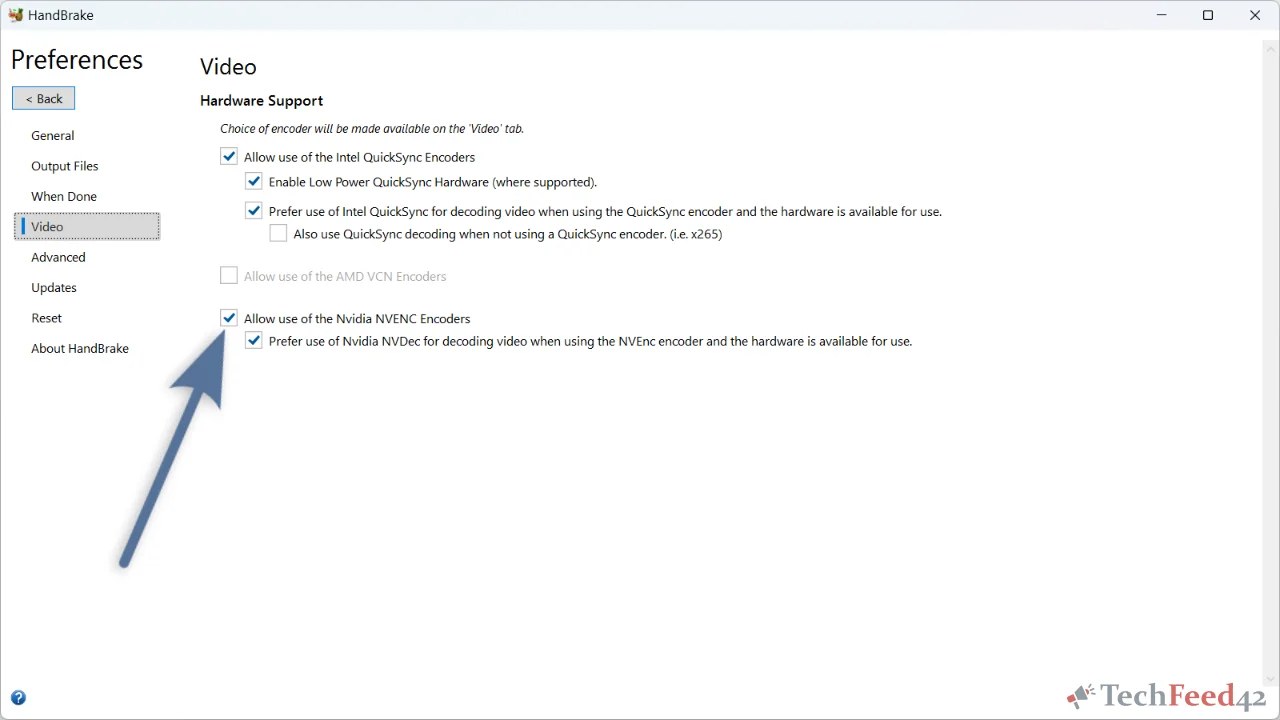
Before loading your video file, you need to enable NVENC in HandBrake’s preferences. Go to “Preferences” and navigate to the “Video / Hardware Support” section. Here, enable the option “Allow use of the Nvidia NVENC Encoders.” This setting lets HandBrake utilize your Nvidia GPU for encoding.
Selecting NVENC in HandBrake
With NVENC enabled, it’s time to load your video file and select Nvidia NVENC as the encoder.
- Load Your Video File: Click the “Open Source” button in HandBrake and select the video file you want to convert.
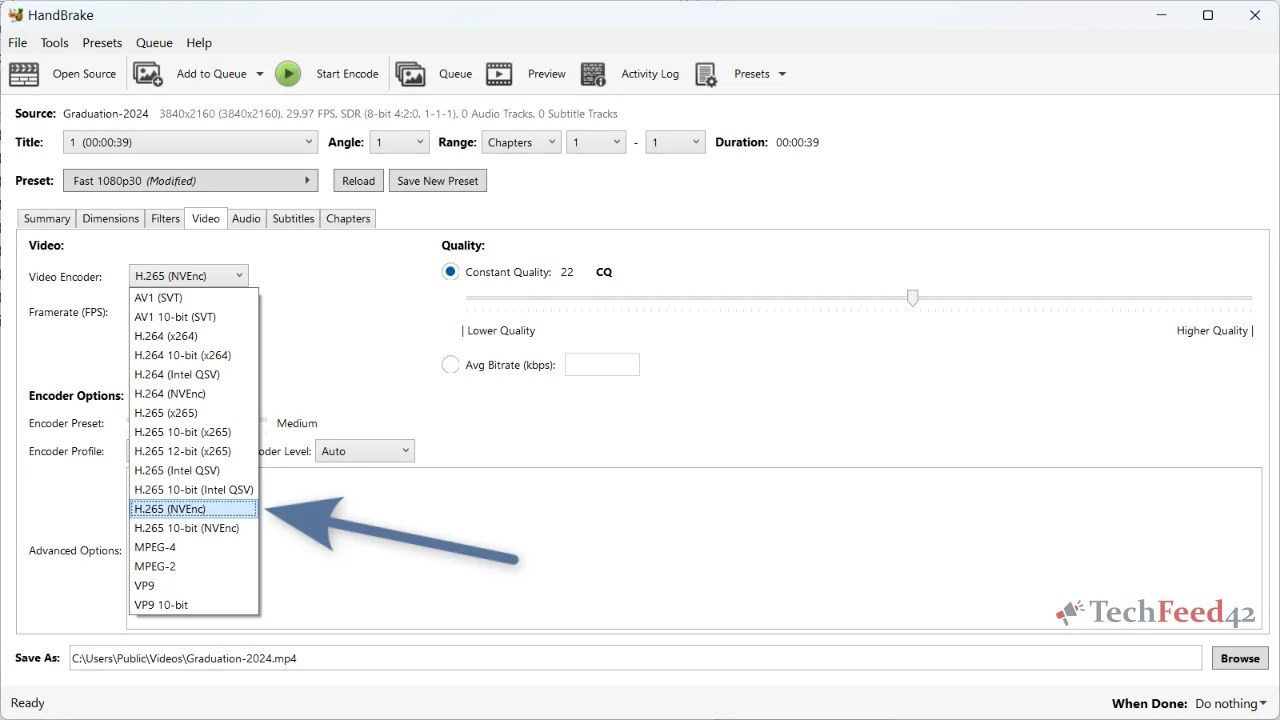
- Go to the Video Tab: Click on the “Video” tab in HandBrake. Here, you can select the video codec you want to use for the conversion.
- Select Nvidia NVENC: In the “Video Encoder” drop-down menu, select either “H.264 (NVENC)” or “H.265 (NVENC)” depending on your preference. By choosing NVENC, you’re instructing HandBrake to use the Nvidia GPU for encoding. Whether you’re converting to H.264 for wider compatibility or H.265 for better compression, NVENC can handle it with ease.
- Adjust Encoding Settings: You can tweak the encoding settings to your liking. The “Preset” drop-down menu allows you to choose between faster encoding times or better video quality. Faster presets will result in slightly lower quality, while slower presets will produce better results but take longer.
Configuring Additional Settings
Once you’ve selected NVENC, you can fine-tune other settings to optimize your video conversion process.
- Bitrate or Quality: In the Video tab, you can choose between “Constant Quality” and “Average Bitrate” modes. For most users, “Constant Quality” is the easiest way to maintain a balance between file size and quality. If you prefer more control over the file size, use “Average Bitrate.”
- Resolution and Framerate: You can also adjust the resolution and framerate of your output video. This is useful if you’re converting videos for specific devices or platforms. For example, reducing the resolution can save space and make playback smoother on less powerful devices.
- Audio and Subtitles: Don’t forget to configure the audio and subtitle settings under their respective tabs. HandBrake allows you to choose which audio tracks and subtitles to include in the converted video.
Starting the Conversion
Once you’ve configured all the settings, it’s time to start the conversion process.
- Choose Destination: Before starting the conversion, choose the destination where you want to save the converted file. Click on “Browse” next to the “Save As” field to select the location and file name.
- Start Encoding: Click on the “Start Encode” button to begin the conversion process. HandBrake will now use Nvidia NVENC to convert your video file. The time it takes will depend on the size of the video, the selected encoding settings, and the power of your GPU.
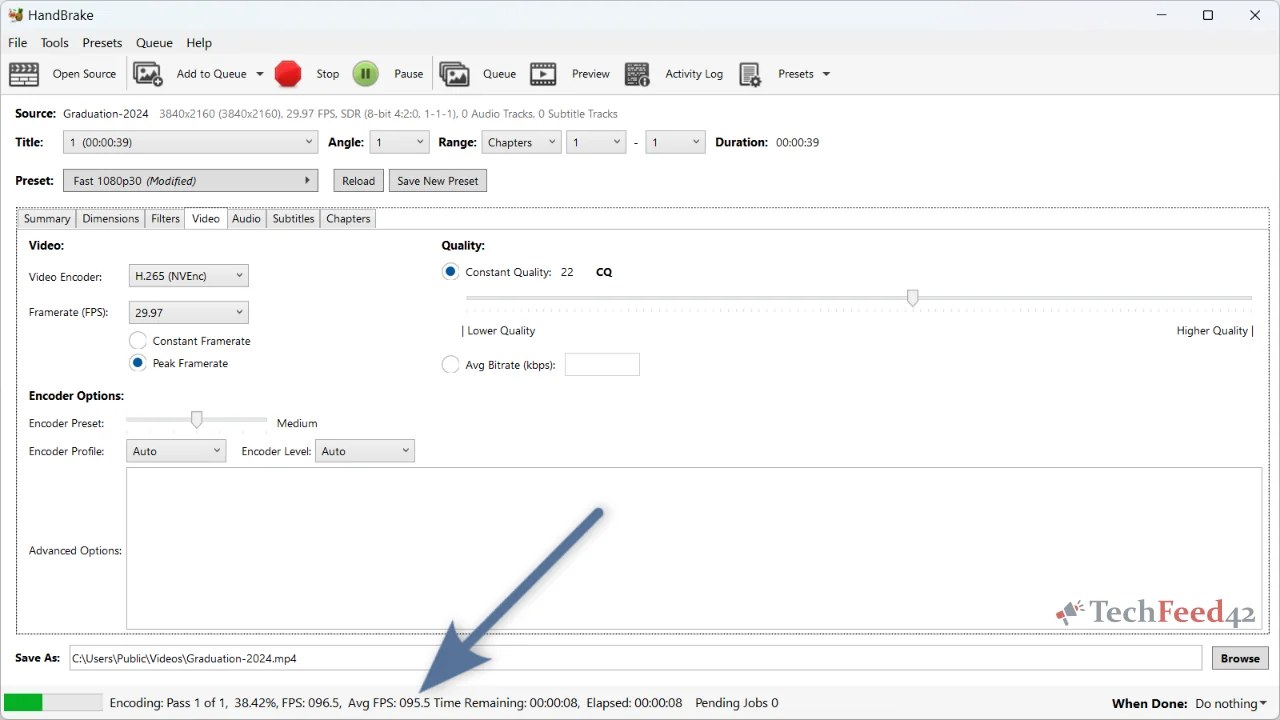
Monitoring the Conversion
While the conversion is in progress, you can monitor its status in HandBrake. The progress bar shows you how much time is remaining. Since NVENC offloads the encoding work to the GPU, you’ll likely notice that your CPU usage is lower compared to software-based encoding.
Benefits of Using Nvidia NVENC
Using Nvidia NVENC with HandBrake offers several advantages.
- Speed: NVENC dramatically speeds up the video conversion process compared to CPU-based encoding. This is especially noticeable when converting large or high-resolution files.
- Efficiency: By using your GPU for encoding, you free up your CPU for other tasks, allowing you to multitask without slowing down your system.
- Quality: NVENC provides high-quality video output, especially when using the H.265 codec. You can achieve smaller file sizes without compromising too much on quality.
Final Thoughts
Converting video files with Nvidia NVENC and HandBrake is a straightforward process that can save you a lot of time. Whether you’re converting videos for personal use, streaming, or archiving, using your Nvidia GPU for hardware-accelerated encoding is a smart choice. With just a few clicks in HandBrake, you can harness the power of your GPU to produce high-quality video files quickly and efficiently.