Recording a podcast at home can be both exciting and daunting, especially if you’re new to the world of audio editing. One of the best free tools for recording and editing podcasts is Audacity. It’s user-friendly, yet powerful enough to produce professional-sounding audio. Let me guide you through the steps to get started with recording your podcast using Audacity.
Setting Up Your Podcast Space
Before diving into Audacity, it’s essential to prepare your recording environment. A quiet space with minimal background noise is crucial. Soundproofing your room can significantly improve audio quality, but if that’s not possible, you can use soft furnishings like curtains and pillows to help absorb sound. Position your microphone away from noisy devices like fans or air conditioners to avoid picking up unwanted sounds.

Downloading and Installing Audacity
First, you’ll need to download Audacity. It’s a free, open-source software available for Windows, macOS, and Linux. Head over to the Audacity website and download the version compatible with your operating system. Once the download is complete, follow the installation instructions. The process is straightforward and doesn’t require any advanced technical skills.
Setting Up Audacity for Podcast Recording
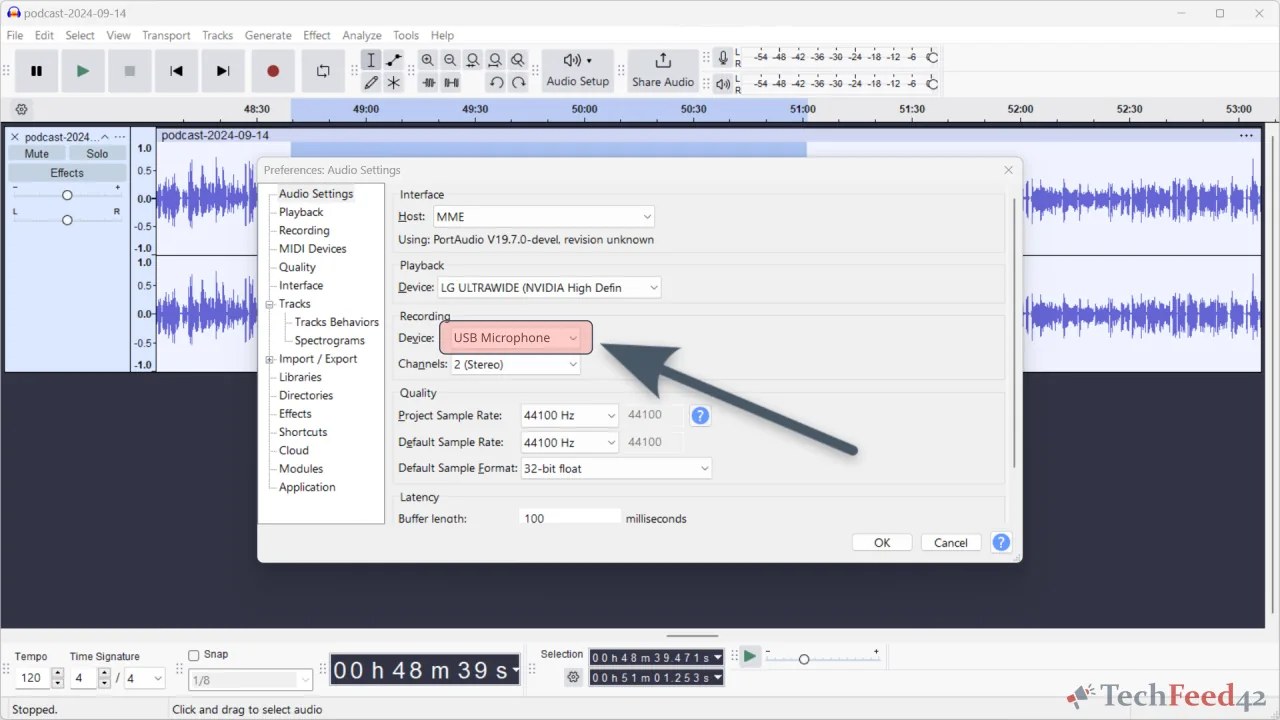
Open Audacity after installation. Before recording, it’s crucial to adjust some settings. First, connect your microphone to your computer. A USB microphone is a good starting point for beginners because it’s easy to use and offers decent sound quality. Once connected, go to the “Edit” menu and select “Preferences”.
In the “Preferences” window, navigate to the “Audio Settings” menu, and find the “Recording” section. Here, you can select your microphone as the input device. For output, you can use your computer’s default speakers or headphones. I recommend using headphones to avoid audio feedback during recording.
Next, set the audio quality. In the “Preferences” window, go to the “Audio Settings” menu, and navigate to the “Quality” section. Set the sample rate to 44100 Hz and the sample format to 32-bit float for optimal audio quality. These settings ensure that your podcast sounds clear and professional.
Recording Your Podcast
Now that Audacity is set up, it’s time to start recording your podcast. Click the red “Record” button to begin. Speak clearly into the microphone, and try to maintain a consistent distance from it to ensure a steady audio level. If you make a mistake while recording, don’t worry. You can edit out any errors later.
While recording, you’ll see the audio waveform displayed on the screen. This visual representation helps monitor the recording’s volume levels. Aim to keep the waveform within the optimal range, avoiding peaks that reach the top and bottom of the track. If the waveform is frequently peaking, reduce the microphone’s input volume to prevent audio distortion.
Adding Multiple Tracks
If your podcast involves multiple speakers or segments, you can record each part on separate tracks. To add a new track, go to the “Tracks” menu and select “Add New” > “Stereo Track”. Record each speaker or segment on a different track to make editing easier.
For interviews or remote guests, you can use software like Zoom or Skype to record the conversation. Import the audio file into Audacity by selecting “File” > “Import” > “Audio”. This way, you can integrate external audio recordings into your podcast.
Enhancing Audio Quality
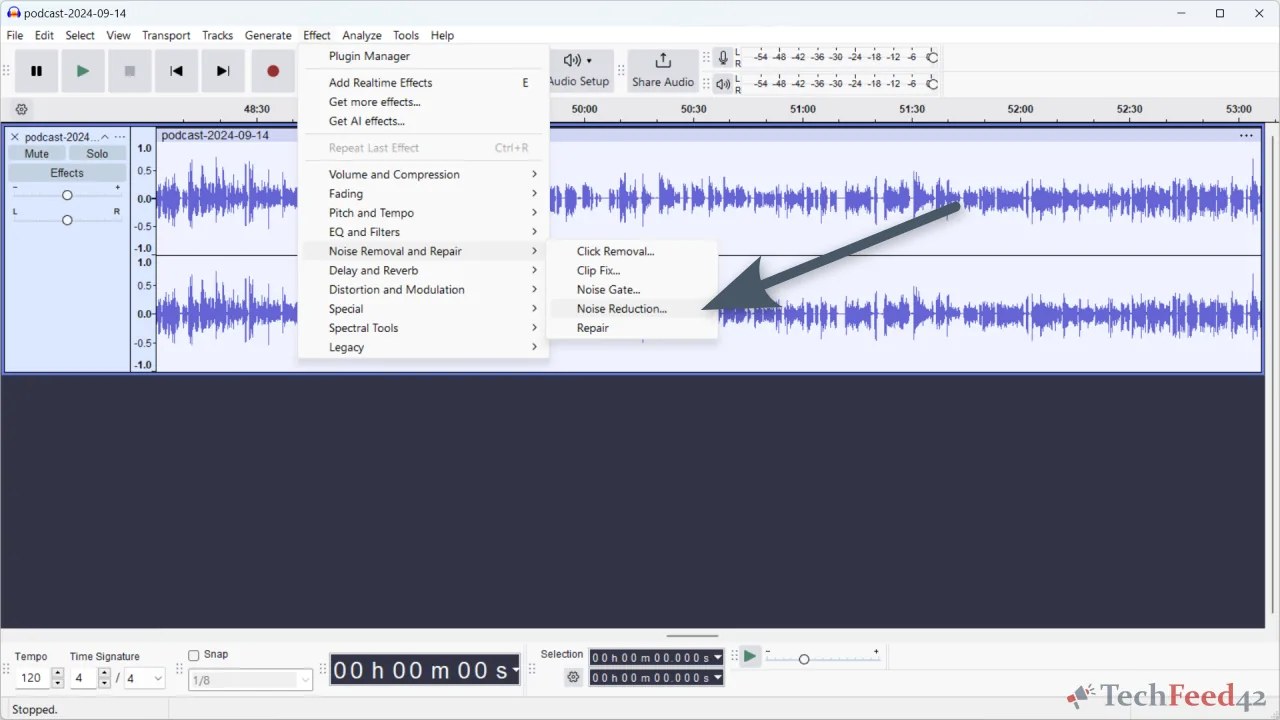
Audacity provides several built-in effects to enhance your podcast’s audio quality. One common issue in recordings is background noise. To reduce it, select a portion of the audio where only the background noise is present. Go to “Effect” > “Noise Removal and Repair” > “Noise Reduction”, then click “Get Noise Profile”. After that, select the entire track, go back to “Effect” > “Noise Removal and Repair” > “Noise Reduction”, and click “OK”. This process will reduce the background noise throughout the recording.
To make your voice sound clearer, you can use the “Filter Curve EQ” or “Graphic EQ” effects. Select the audio track and go to “Effect” > “EQ and Filters” > “Filter Curve EQ” or “Graphic EQ”. These tools allow you to adjust different frequency bands to enhance vocal clarity. Focus on boosting the mid-range frequencies (around 1000-3000 Hz) to make vocals stand out. Additionally, using the “Compressor” effect helps level out the audio, making softer sounds more audible and reducing the impact of loud peaks.
Editing Your Podcast
After recording, it’s time to edit your podcast to ensure it flows smoothly. Audacity offers various editing tools, such as cutting, trimming, and moving sections of audio. Use the “Selection Tool” to highlight parts of the audio you want to edit. To remove unwanted sections, simply highlight the portion and press the “Delete” key.
You can also use the “Envelope Tool” to adjust the volume of specific sections. This is useful for balancing audio levels, especially when dealing with multiple speakers. To fade in or fade out audio, select the portion you want to modify, then go to “Effect” > “Fading” > “Fade In” or “Fade Out.”
Exporting Your Podcast
Once you’re satisfied with your podcast, it’s time to export it. Audacity allows you to export your project into various audio formats, with MP3 being the most common format for podcasts. To export, go to “File” > “Export” > “Export Audio”. Choose MP3 as the file format, select a location to save the file, give your podcast a name, and click “Export”.
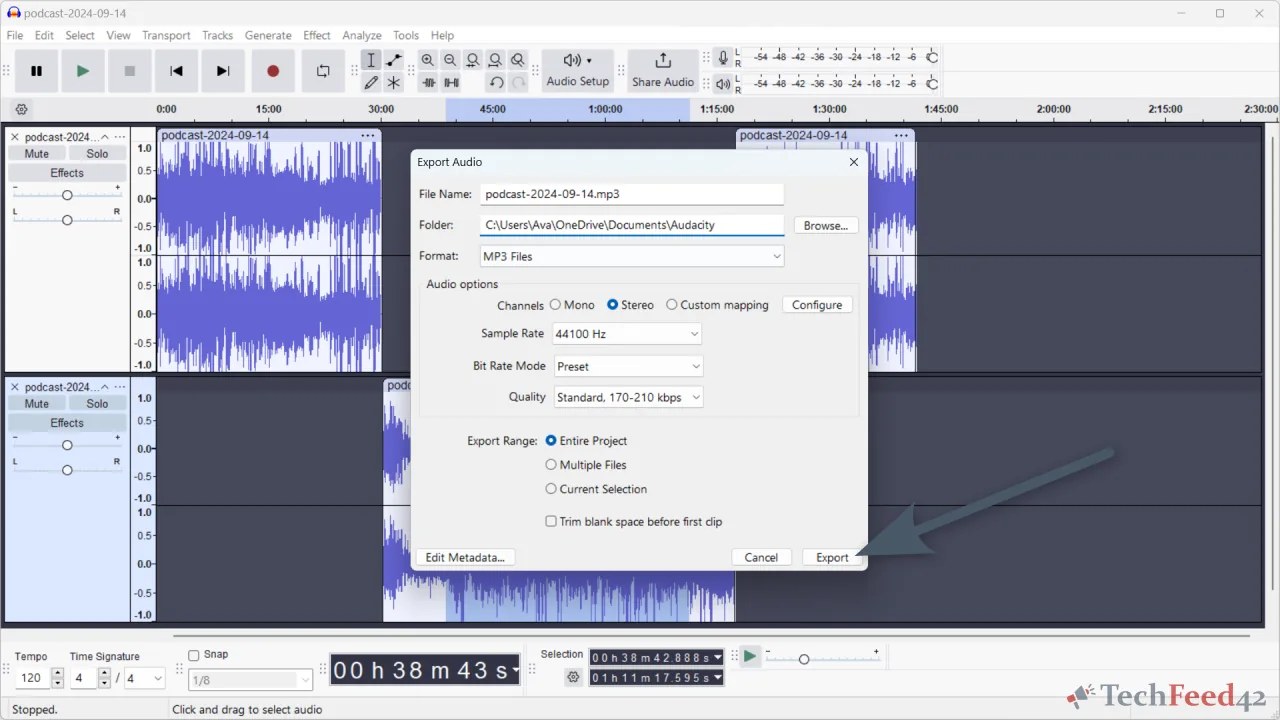
In the “Export Audio” window, you have the option to edit the metadata for your file. This information includes the podcast’s title, artist, and other details that can help listeners find your podcast. Click the “Edit Metadata” button to fill in the relevant fields. After editing the metadata, click “OK” to complete the export process.
Final Thoughts: Content Over Perfection
Recording a podcast at home using Audacity is a rewarding experience. With a bit of preparation and practice, you can produce high-quality podcasts that engage and entertain your audience. However, don’t stress too much about perfecting every detail of the audio quality. What truly matters to your listeners is the value and substance of your content. Audacity’s powerful features make it an excellent choice for both beginners and experienced podcasters. So, grab your microphone, set up your recording space, and start creating your podcast today.